LONDINIUM 1-P overhaul
Seven years ago I got my big LONDINIUM 1-P espresso machine:
https://kostverlorenvaart.blogspot.com/2015/05/hey-look-new-londinium-l1-p.html
It has found a new owner now. I mostly used the other LONDINIUM machine that I have so the L1-P had become a 'sleeping beauty' catching dust.
Jeroen in Utrecht picked it up and over the past weeks he gave the machine a full and complete service overhaul.
Scaling was an issue -- apparently the inline water filtering that I used was insufficient. I have since decided to renew the filter after 50% of its predicted life cycle.
Luckily Jeroen documented the procedure well and was kind enough to share his story here. Thankyou Jeroen!!
Jeroen's story
Picked uo the machine at Frans' place. The OPV showed a tiny hissing leak at first inspection. No problem, easy to replace. Emptied the boiler and loaded into the car.
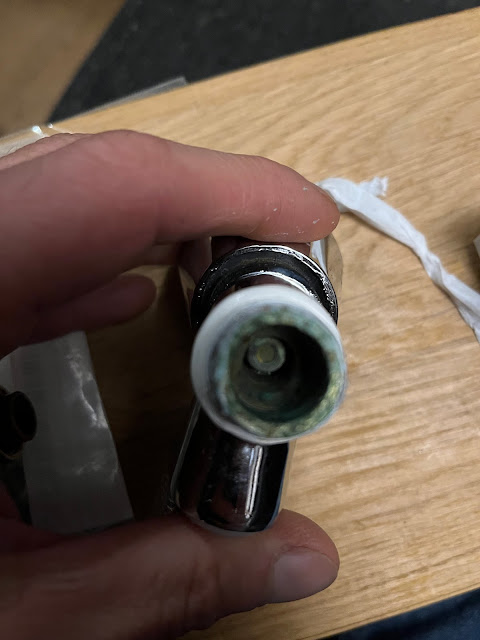
At home I noticed the manual fill lever seemed not to do much but the machine seemed to work fine anyway. Steam valve wasn't smooth so I decided to service both steam and hot water valve. Noticed quite some scale...

Citric acid works wonders:

Then it struck me that the boiler water level seemed high so I cleaned the probe:


This did not make a difference though. Warmed up the boiler and tapped water.
Anti-vac works fine.
Interestingly the water level is not dropping in the water sight glass. One day later the water lever in the sight glass has dropped so it's very slow to drop, clogged up somewhere. Also, the manual fill valve remains silent, clogged up as well.
Pipes are aso scaled up so time for a more thorough bath in citric acid.


Preparing a full disassembly for descaling, a picture to remember the connections:

Boiler taken out. P-stat clip on top left is loose.

Element is not easy to get out. Goit some advice from Reiss.

Just rinsing the boiler with water already gets some muck out:


Cleaned the heat exchanger fill line first:

And the complete manifold. The other pipes too although they seem to be clean still.

Cleaned up the other end of the manifold as well. The green hose is also nice and clean again. The cup, a little mod by Frans, also nice and clean again.

Some more disassembly. Valves are off so the top of the frame can be removed as well. You cans ee that I already re-assembled some of the cleaned pipes, ike the line to the pressostat. I let the pipe to the manometer be, as I did the thermosifon pipes which I found difficult to remove.


The boiler has only party been in a citric acid bath but I really have to get the element out first. Some pushing around with a screwdriver helps to get it to move.

It needs a good citric acid bath and the boiler looks black inisde.


First the element in acid.

The boiler after a few hours in acid:

Found a loose part. Documenting for later re-assembly.


All in a grout tub, taking care to keep the element's connectors above water:

Two and a half days later:


Full cleanup of the valves:

Managed to take the manual fill valve off the manifold, using a vise. Cleaned it too as well as I could.


And then re-assembly, getting it all to fit again...


Waiting for some parts that I ordered I took on a side project. With two LONDINIUMs I also need two water lines (descaled water!). So far I was switching lines between the two LONDINIUMs but that is a hassle.
I had gotten Frans' nice board with a pressure / flow regulator and two taps but that did not fit in my cabinet:


Manual fill valve still leaking:

Luckily I had ordered a new one already. It is a 1/4"BSP female on both ends. The new one is bigger though...

Still it fits, with some LOXEAL and patience:


Adapter and line back in:


Gave the end of the manifold an extra shine:


New gasket for the element. Old one on the top/left. Note how these are different from the other LONDINIUMs for home use:


A bit of LOXEAL 4

And back in the boiler!


Temp probe, connectors and cap back on


New safety valve (right), and just to be sure a new anti-vac valve.


P-stat clip attached better with nuts and bolts. Pop rivets were worn and borrowing extra tools took longer due to COVID.

First test -- manual fill valve works!
Water level sensor works as well!
Warmup goes fine as well. As the pressure increased I did see I had not fastened the sight glass connections well enough ;-)
And finally the proof of coffee pudding is in the pulling of the shot ;-)
My Acaia Pearl is too big for the drip tray and the distance to the brew group is large hence the construction:
Some more pictures of the end result:


Some blackness can be found on the shower screen so I plan to pull the brew group sleeve and clean up the HX inside. The water level seems quite high so I might look into that as well.
To be continued.


Reacties