The PXG4 is still on its trip from France to Amsterdam but that's fine as we can practice the set up in theory.
Below is a diagram of the front panel. The main attractions are the two four-digit displays which will mostly show the two most interesting temperature values:
PV (Process Value) being the measured temperature in the beans as a result of the manipulations of the PID, and
SV (Set Value), the temperature level that's the current target for the PID to approach.
The tiny light of C1 indicates if the heater is on or off and when it's 50% on, the light quickly flickers on and off, showing a half-dimmed light intensity.
The SV light blinks when the heater is adding energy to raise the temperature or to keep it at the current level.
The
A/M User key on the bottom left is used to flip through the different channels/pages of all the possible modes and settings and the
SEL key is used to select any one of the options that can be browsed in any given mode/menu using the up/down arrow keys.
For instance, when you're in the normal operation mode and you press and hold A/M, the SV display changes to display the output value that drives the SSR and thus the heating element, between -3% and 103%.
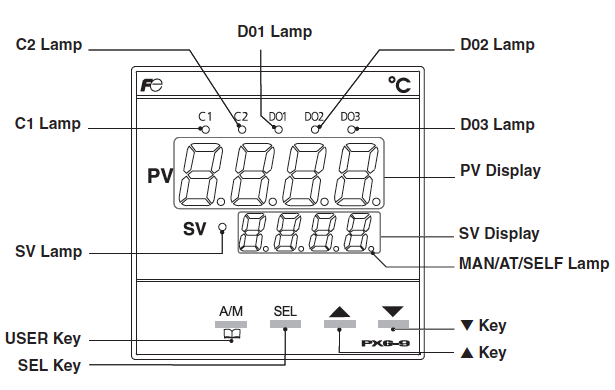 |
| Front panel diagram |
Below is the basic map of all menus. Don't let it intimidate you too much. All details of it are explained briefly but sufficiently in the 156 pages of the manual. At first sight it may look way too complicated but as you read on and familiarize yourself with the device a little more, the map serves like the clear and simplified subway map of a big city.
It basically tells you that you dig into lower levels of the menu by holding the SEL key, on the given level you browse the options using the arrow keys, press SEL to select one and then return to the home menu by pressing A/M.
I will show the things we need to set to get going (thanks Wa'il for pointing these out).
Other settings, like a 'mask' to prevent visitors from accidentally changing any parameters in deep hidden layers of the menu structure or a password protecting these critical settings can be figured out leasurely at a later moment.
Luckily, some values and settings regarding the control of a motorized valve can be ignored on this setup. This makes the puzzle easier to solve.
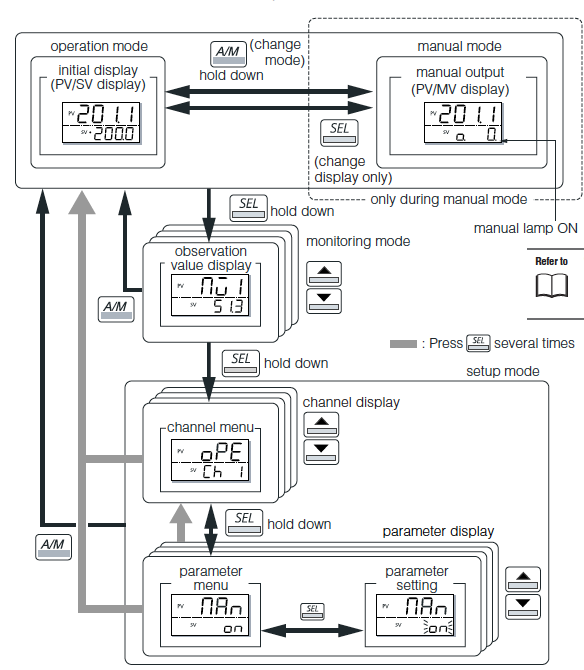 |
| Basic map of all menus |
The PID needs to know what's the effect of its manipulation of the heater and there are many ways to inform the PID about the temperature in the bean mass. I use a K-type thermocouple probe which happens to be the default setting, so I won't need to change it. For those who want to use a different device to communicate the resulting bean temperature, here's a list of options:
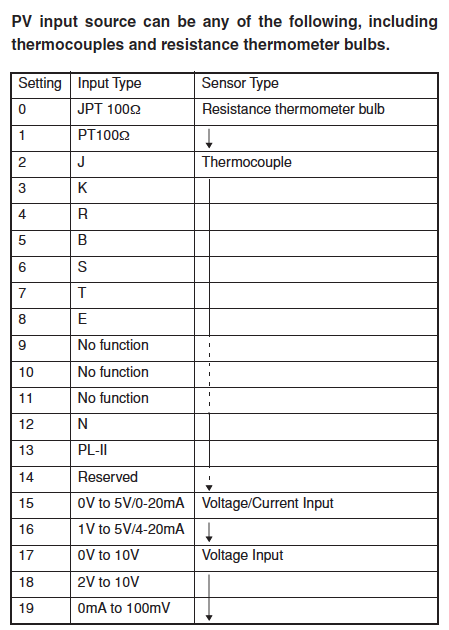 |
| Thermocouple or other ways to provide Process Value input to the PID |
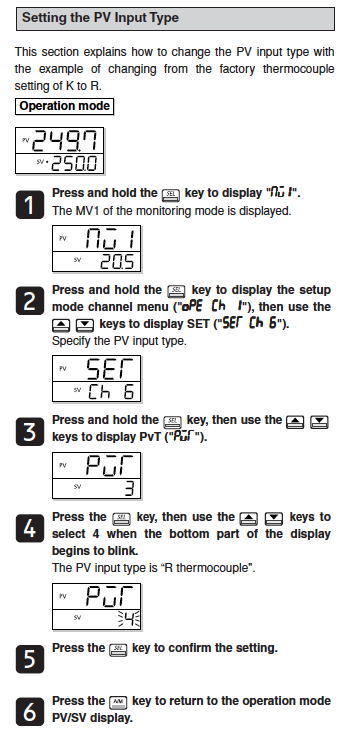 |
| Changing the PV Input setting |
The PID switches the heater on and off to get (and keep) the beans at the desired temperature. If you use a relay switch that actually moves click-click from ON to OFF, you may want to prevent the PID switching it on and off very rapidly. You get a very precise result but also you wear out the mechanism very fast and you will be replacing the switch frequently.
Luckily, I have an SSR, a Solid State Relay that switches on and off without a physical moving part so I can afford to have it click on/off every one or two seconds.
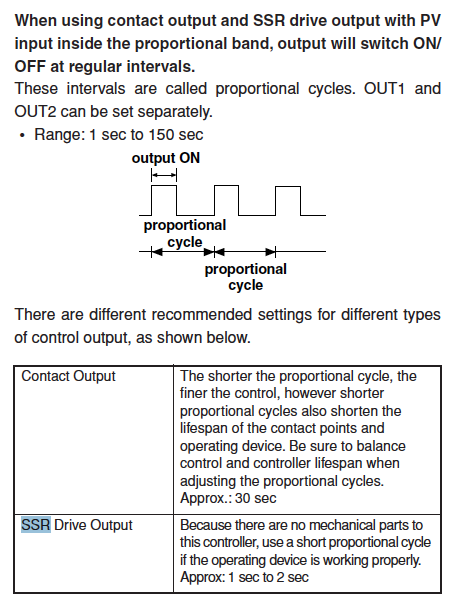 |
| Brief explanation of contact/clicking output or SSR |
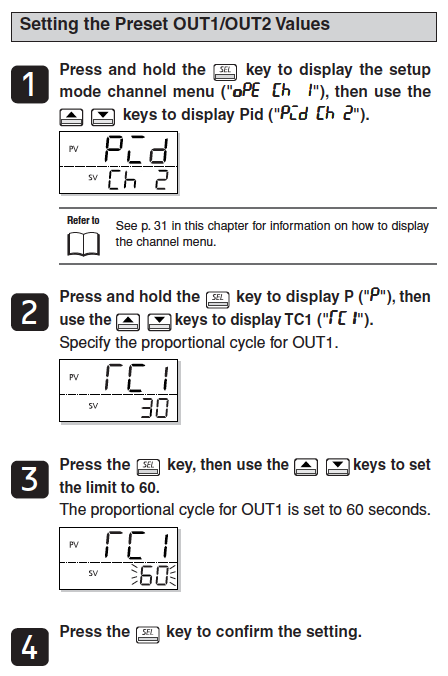 |
| Setting the output cycle. We keep it 1-2 seconds for the SSR |
The PID needs to know how to respond if the beans get too cool. Hit the gas or hit the brakes? For a human this is intuitive but it needs to know. We keep it on "rv--" meaning "when tamp falls, raise heat." We have no extra device to cool instead of heat and just "doing nothing" has a cooling effect.
 |
| Beans to cool? Raise heat. |
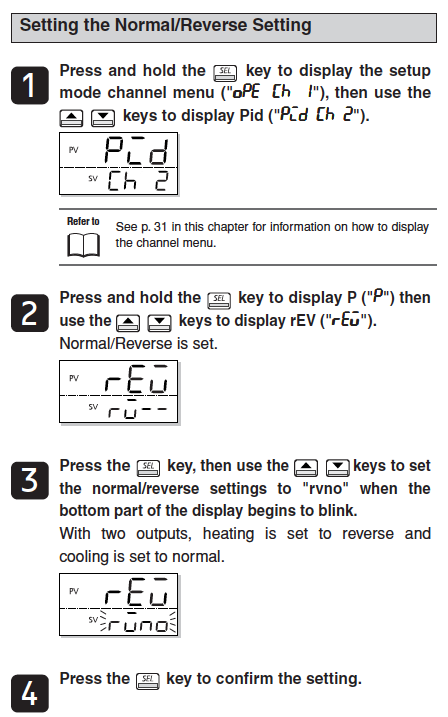 |
| Setting "Heating only", keep it "rv--" as is in step 2 |
Are we heating a kiln with pottery for many hours or beans for about ten minutes? The entire procedure of raising bean temperature, keeping it at a certain level, then raising it further and holding it there before raising more, possibly to a spike before ending the roast in a cooling session will be measured in minutes and seconds so we need to make sure the PID thinks in these time units.
 |
| Ramp, Soak and Spike |
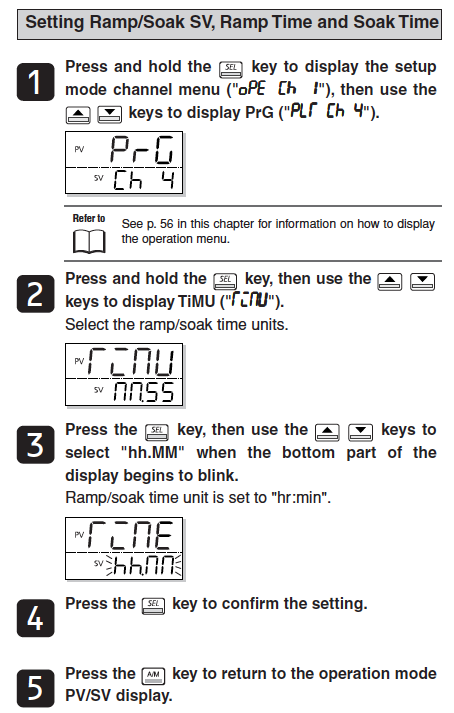 |
| Time units, we keep these to mm:ss as in step 2 |
The internal magic of controlling the variables of bean temperature over time, with beans decreasing in weight, bouncing around in the roasting chamber, absorbing heat one moment and radiating their own internal heat another moment, can be done by the PID controls alone which are complicated enough as they are, but one can also add the undisclosed "fuzzy logic" of the device. This will help to prevent an overshoot of a newly set SV target. If the target temperature is much higher, and the PID switches on full blast heater capacity to get there, fuzzy logic will remind it to lower the heater power in time, or else any remaining heat off the glowing red heater will make the beans hotter than one had intended.
Tip from Wa'il: It's best to first do an auto-tune (see below) without beans, then change PID control to Fuzzy and then do an auto-tune again with beans as described below.
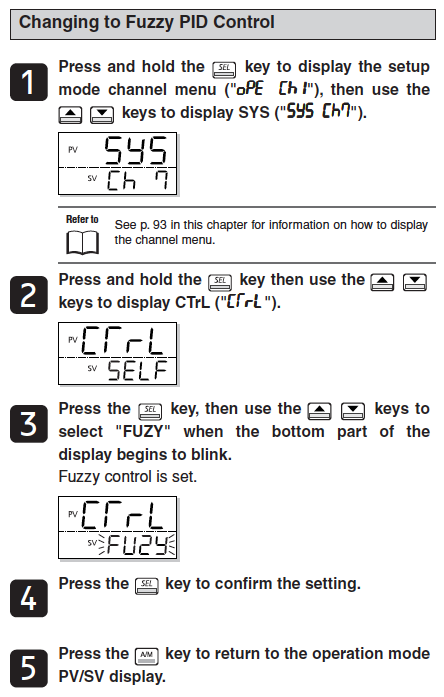 |
| Making sure the PID uses Fuzzy logic |
All basics are set up now (except communication with the USB - Computer - Artisan).
We take 230g of beans to sacrifice, load the roaster, set SV to the temperature of first crack, for instance 204ºC, and when it reaches that temperature we switch on
Auto-tune where the PID will figure out its own optimal values for P, I and D.
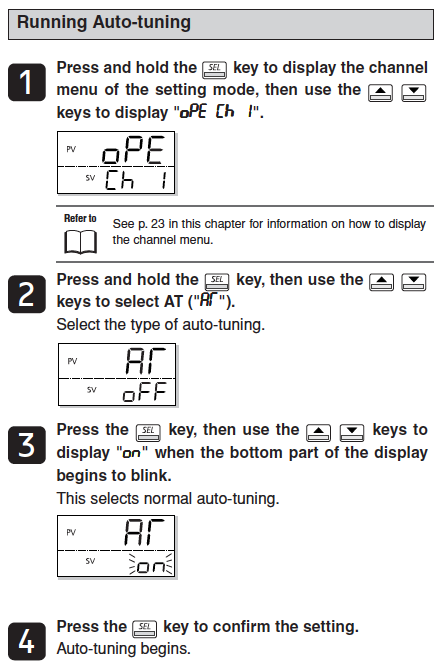 |
| Have the PID finds its own best settings |
|
This Auto-tuning will take about two minutes, Wa'il told me.
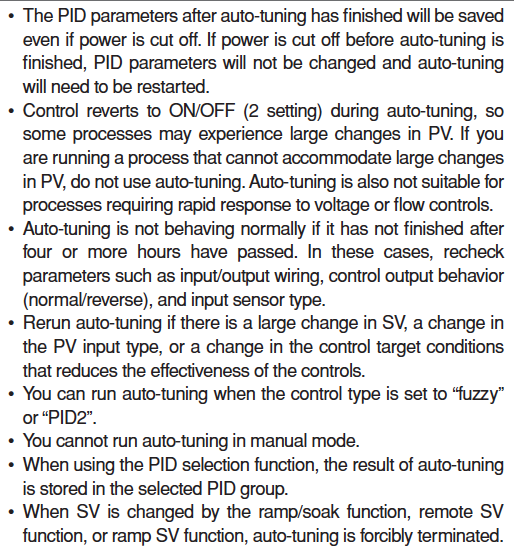 |
| Things to remember about Auto-tuning |
After Auto-tune has succeeded, some values of the findings for P, I and D may be altered as shown below but it's probably best to let tem be for a while and get well informed before tweaking these values. For instance, if the value for P is too small, the system may become unstable and if it's too big, the response may be sluggish.
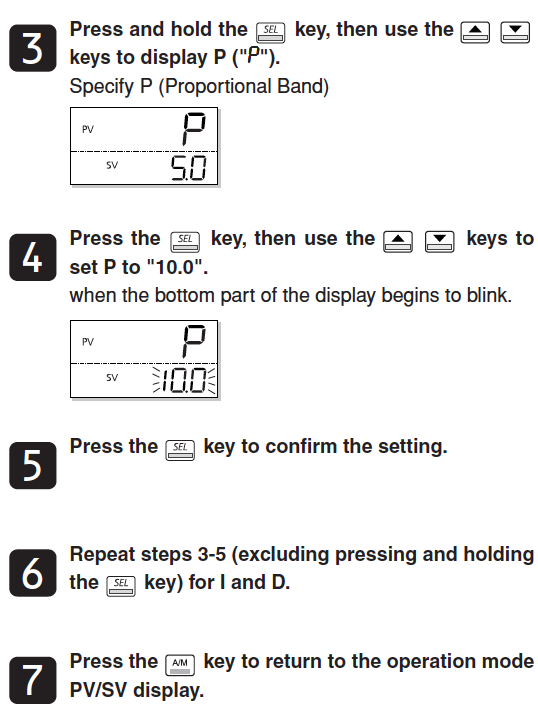 |
| P, I and D values can be altered, but proceed with caution. |
This is how I expect to wire the PID:
The
toggle switch must be set up to be able to start the entire roasting sequence with flipping that switch.
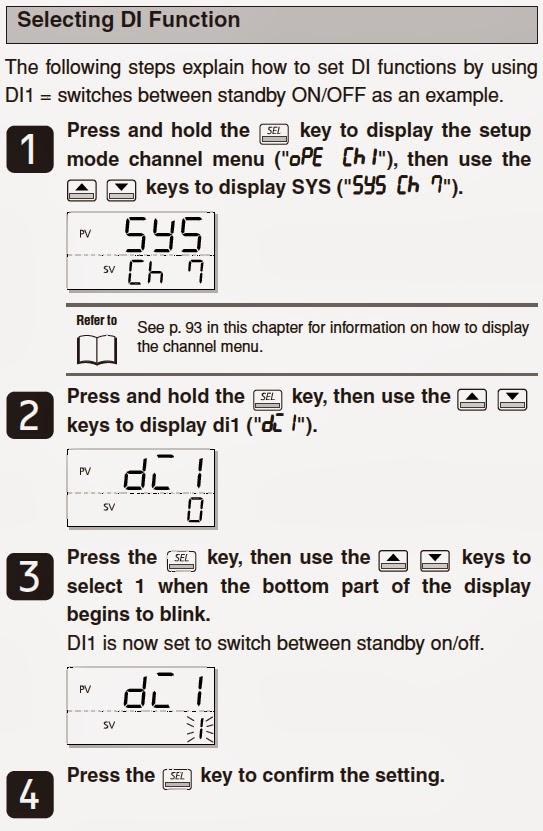
This "digital in 1" switch can be assigned the job this way:
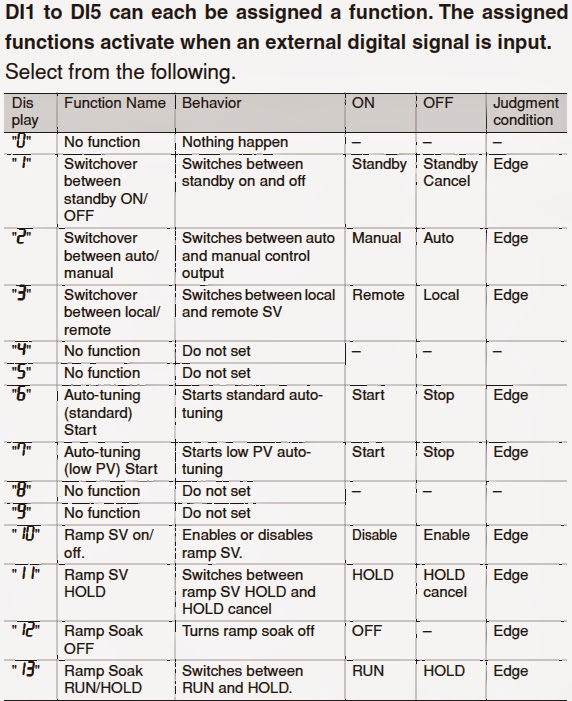 |
| A number of options for DI-1 |
 |
| Selecting "13" for DI-1 selects Ramp/Soak to Run / Hold, "42" would only select Run |
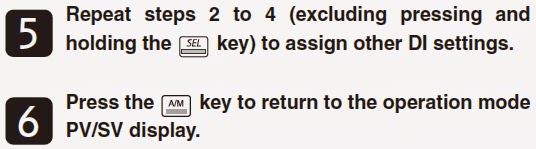 |
| Only one Digital In here, so go to step 6 |
Before starting any operation, the PID needs to be on for 30 minutes or else it might be confused about the exact temperatures:
A to-do list suggested by Fuji, with the subjects mostly covered in these blogs:
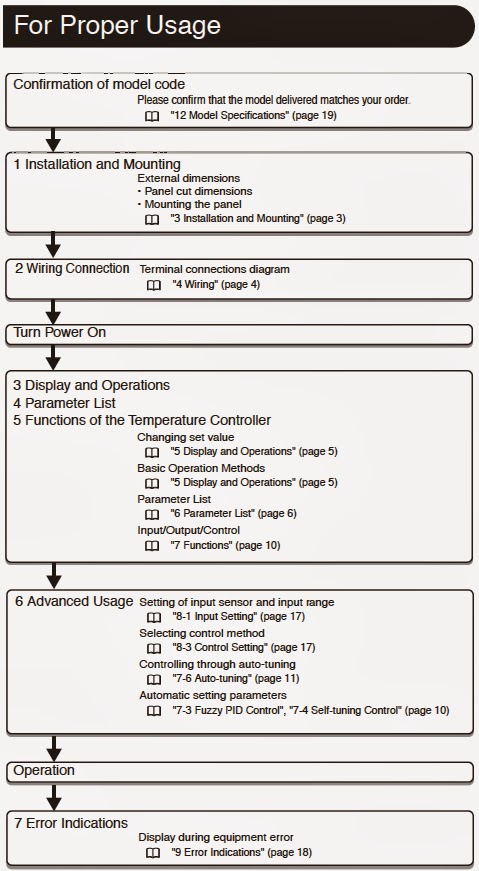 |
| Fuji's step-by-step advice |
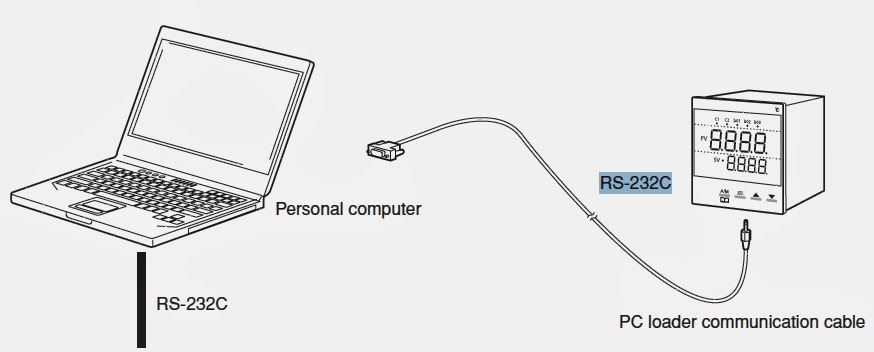
For communications to the computer, I ordered the
PXG/PXH Serial Cable TK4H4563-E from Fuji. It looks like this in the manual:
 |
PXG/PXH Serial Cable
Ref : TK4H4563-E |
To provide RS232-to-USB connectivity, I ordered these from CONRAD (sorry no currently active links at their updated website):
That's it for now! It seems I'm ready for the Fuji PGX4 to arrive.
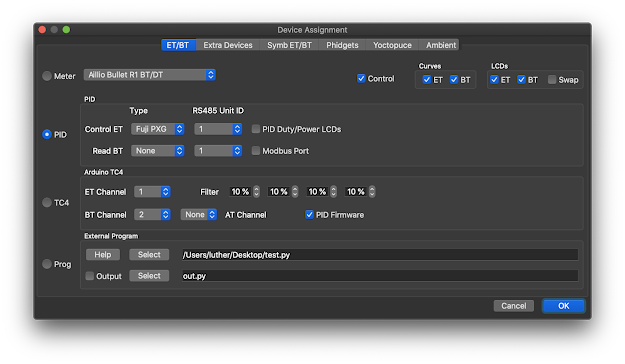
PS 13 sept 2020 some screen snapshots of my current Artisan setup pages:


Reacties
I believe i have the correct settings (parity, baud rate etc) on the Fuji and in Artisan but when I hit the ON button I receive a Modbus error 31726 and the readings display -1. I cant for the life of me figure it out. I wonder does any of it sound familiar to you?
The Apple FTDI drivers are already installed, Artisan sees the Comm port as the USB adapter and the thermocouple reads correctly on the Fuji. Im using a twisted pair cat5e cable.
Many thanks! Mike
Have you also tried posting on the Artisan mailing list? There's a bunch of expert users there.
I am on Artisan 2.4 here. Can you update your Artisan? It's easier to get support for the new versions -- the updates were developed for a reason ;-)
On a current Macbook Pro you would not need the special FTDI drivers as te Mac already understands the device, so in that case the drivers are maybe in the way actually. I have a 2017 Macbook Pro with MacOS catalina 10.15.6
Very early on when I was trying to get the laptop to communicate with Modbus I installed several drivers and Marko Luther of Artisan had to point out to me how to de-install those from the command line because it was a spaghetti of drivers all trying to do the same one thing.
Have you documented / illustrated your exact setup somewhere online? If so, this would probably make it easier for an expert to browse your info ans point out what to do.
Best regards,
Frans
I have since updated to 2.4 and am still encountering modbus errors so yes, I will post / document my scenario to the mailing list today.
Many thanks again!
Mike
Okay! I'm confident it'll get sorted then.
See you on the mailing list!
Frans