LONDINIUM R How to swap the steam arm to the left, 12 March 2018 onwards
The version of LONDINIUM-R shipping today has an ambidextrous boiler, which means that while the steam is normally on the right side and hot water on the left, one can swap the parts bolted onto the boiler and swap the steam/water parts on the valves on the front of the machine.
Below is a video and a more extensive description of the procedure which one can do at one's own risk, with the understanding that it's best to ensure one has all the necessary tools and the required understanding of working with this kind of devices.
Read the instructions as often as necessary, watch the instruction video several times over. If possible, ask for experienced help.
Start with a cool machine (after it's been off for hours)
Have this:
Hammer
All these exact sizes of wrench / spanner: 17mm, 19mm, 21mm, 22mm
Do NOT use an adjustable spanner / monkey wrench here! A set spanner is much better suited to being struck with a hammer than an adjustable one which will round off the heads on the nuts as almost all the nuts on the machine are very tightly fastened and they will be ruined if the wrench spanner is not a precise fit. A set spanner/wrench is also a lot smaller, and therefore easier to use in the tight confines of an espresso machine.
Loxeal 55-03 nut locking threadsealing may be useful. A hybrid formulation, less strong than a standard nut locking formulation yet stronger than standard thread sealant. Rated for potable water applications.
Loxeal #4 Silicone grease can also be helpful in case screwing in a nut feels rather dry. Please note that when using the Loxeal #4 grease on a thread, one cannot combine this with the Loxeal 55-03 threadsealing. It's one or the other.
Always be careful with the thread of any nut or coupling as the copper is a soft and vulnerable material. Do not cross-thread a nut, do not force it if it feels difficult.
Before starting, take off drip tray and grate so no tools can damage it. Take off top panel and side panels and place them in safe spot (keep left/right panels well apart).
Make sure not to scratch or mark the glossy front panel nor the chrome flick valves. Again, not covered by the warranty, relatively expensive and a LOT of work because of the number of fittings that need to be removed (including the group, the boiler pressure gauge, the LED lights, the on/off switch, and both valves) in order for the front panel to be changed if it is scratched.
 |
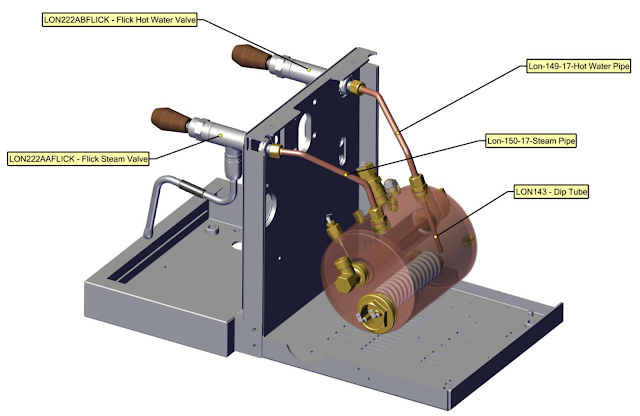
| The parts we will work on |
Start by using the 17mm spanner to take off the copper steam pipe and hot water pipe. On the boiler side, use a 19mm spanner to hold the lower nut on the boiler.
The nuts may seem hard to losen. Use a hammer to repeatedly strike the spanner (not too hard but carefully) so it shocks the threads apart.
 |
| These pipes will later return on the same side where they came from |
Consider placing a wedge between boiler and front / back to support the boiler against hammer blows.
Mark the pipes (top/bottom) and lay them carefully aside for re-assembly. The one on the left will later return to that side, the one from the right will go back there.
Next use 19mm spanner to take off the hot water dip tube fitting and the steam fitting and their copper washers.
 |
| Swap hot water dip tube and steam fitting |
Do NOT pull hard on the wrench by hand or you will distort the soft copper boiler. If you do, you need a new boiler (not covered by guarantee for this procedure). Also do NOT damage the delicate copper tubes near the spanner.
If they seem stuck, re-assemble pipes and switch on the machine (safely, stay clear of power cable / wires) to heat the boiler. When pressure gauge begins to go up, switch off again and make sure to remove power plug from socket. When hot, the nuts come lose a little easier.
Swap and re-assemble hot water dip tube and steam fitting. Take great care to not damage threads and not cross-thread at assembly as replacement or parts is expensive.
 |
| Fittings swapped |
 |
| Pipes return where they came from |
Tighten but not over-tighten. You feel the nuts lock, then tighten with one or two taps with the hammer, just a tiny bit more. Experience is highly valued and nearly indispensible. Do no pull harder and harder. Gauge how far the wrench moves when struck by the hammer as an indicator as to when the nut is tight enough - if the wrench moves less than 10mm when struck with the hammer it is tight enough. Hitting beyond this with the hammer will destroy the thread.
 |
| Loosening the small lock nut with 21mm spanner |
 |
| Taking off the big nut |
Do the same on the other valve. Then re-assemble the hot water nut / spring combination on the other side (and the steam wand nut vice versa). Push up the nut with the spring, carefully feeling for the spot where it grabs the thread below the small lock nut. Counter-act the upwards push by holding your hand on top of the flick valve.
 |
| Hold top of the valve against push from below |
Switch on the machine safely, staying clear of power cable and wiring. Check for any leaks. If a connection leaks, tighten it slightly and carefully. If this remains unsuccessful, re-do above and use the Loxeal 55-03 to get better sealing. Check again.
If all right, switch off, remove power plug from socket, attach side panels and top panel again.
Done.

Reacties