Mandheling Roast on FZ94: Sliding Along the Roast Curve
In March last year I wrote about roasting Indonesian beans from Sumatra. These Mandheling beans needed a lot of sorting before the roast but the result was delightful.
This year I bought a 60kg bag of Mandheling from a different source, Het Hoofdkwartier in Amstelveen and this shipment was much cleaner. There are very few beans to sort out and I was excited to see how these would roast and taste best.
To compare the two, this is a picture of last years's Mandheling:
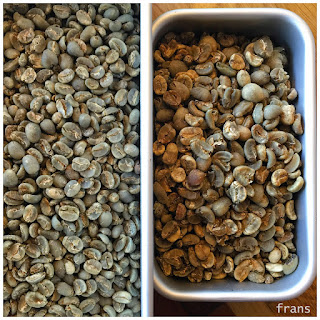
And this year's Mandheling:

This was also a good time to explore the "power slider" roast method that was recently enabled with the help of Tije de Jong who installed three SSR's inside the control space of the FZ94 roaster and Marko Luther who built this slider option into Artisan, creating the option to control the PID in such a way that the slider on the computer screen changes the intensity of the heat coming from the three heating elements below the rotating drum inside the FZ94 roaster.


I configured Artisan so that the full 0-99% range of the heating power slider actually covers the spread between 65% and 99% of maximum energy.
During actual roasting, most settings of the slider are in the 50%--99% range (corresponding to 82%--99% of actual energy).
This handwritten table gives an impression of the spread and range of the sliders, with the power slider on the right:
While warming up the machine, a wider range of heating power is used and I mostly do that using the automatic PID, only varying the air flow a bit in the process. This warmup routine ensures that a certain consistency is offered in the energy loaded into the machine body before the beans are charged and roasting begins.
Batch 10 was charged with the machine by the open window on a cool evening and it was noticeable that the BT lagged behind a bit after TP which was also later than batch 9 had logged (in the background here). I kept the airflow a bit lower, saving energy so by the time the beans approached FC, the BT line (red now) was precisely on top of the target profile (grey line). The orange line depicts the heater energy which I step back from 100% near the 9 minute mark to 50% of the slider spread after 13 minutes, with the airflow (blue line) steadily increased after 5 minutes, briefly on max capacity during FC to prevent overshoot and again building up towards max in the end:
 Another relatively dark bean from the above profile, but in my notes on the print of it I wrote that it was wonderful as cappuccino, and if pulled on the La Pavoni (15g in, 26g out in 23s) it was beautiful, soft and sweet even. After I turned down the pre-infusion pressure on the Londinium L-R it also yielded the same soft sweetness when I used the simple IMS basket designed for the 16-20g range, using 15.5g of grinds for 23g of espresso in 30s. My daughter Lore who also has a La Pavoni wrote me that she found this roast tasting great "with more coffee from the same weight of beans" out of their single dosing grinder.
Next, I moved the machine to a place closer to my kitchen and I did not need the open window anymore so a more stable room temperature airflow was fed to the roaster. This also shortened the time needed for pre-heating.
This enabled me to develop a much more easily repeatable pattern and a roast that is consistently pleasing with a spicy, sweet taste and a rich aroma:
 In the above profile you can see how I practically copy the steps from a previous roast. I charge at BT/DT of 220-160, aiming for an AUC around 460, a roast time around 15 minutes, a development time of about 4 minutes and a drop temp around 205ºC.
Same with the two next batches:
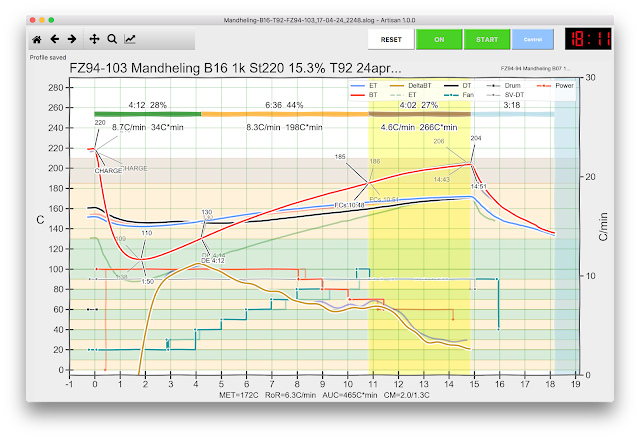
 The red BT is practically spot on for most of the profile. In the above batch 17 you can see that the bean mass (stored cool) took 20 seconds more to reach TP and I shifted the background to synchronise that so after DE all went exactly as planned and even the brown Rate of Rise line steps right along the target to copy a previous roast that went well.
Variations in roast color of T89-T95 are minute and the overall consistency can be established by looking at the combination of profile, AUC value, weight loss, Tonino value, end temp and roast time.
It was already possible to use sliders for airflow and this allows a very effective way to build up more heat or quickly dissipate heat in case of an impending overshoot (which can be observed by looking at the way the Rate of Rise changes).
Additionally and decisively for me, the option to use sliders to finetune the power going into (and radiating out of) the three heating elements, instead of switching one or more elements completely OFF or ON, is an extremely helpful way to precisely slide along the intended roast curve for the desired production result in the espresso cup.
Greetings from Poland, where the Mandheling beans taste great!

PS Marc Assink, a fellow roaster in The Netherlands, purchased from the same Mandheling stock and he roasted 800g on his 1kg Toper Cafemino roaster. This machine is unable to regulate the heat input and there is limited control of airflow so the options to modulate the profile are also limited:

A picture of the resulting beans:

He described the taste as "spicy -- good for cappuccino, nice, not spectacular" so it probably was a dark-ish roast. Like another friend who roasted these same beans, he remarked that FC is hard to distinguish. SC is at times more audible and I decided to just automatically mark the onset of FC at the temperature level where one can mostly observe the BT suddenly rising, a sign of the exothermal reaction typical for FC.
Marc has since purchased a 2.4kg HAS Garanti roaster so he will be back, in time, with a more detailed and better configurable approach.
This year I bought a 60kg bag of Mandheling from a different source, Het Hoofdkwartier in Amstelveen and this shipment was much cleaner. There are very few beans to sort out and I was excited to see how these would roast and taste best.
To compare the two, this is a picture of last years's Mandheling:

And this year's Mandheling:

This was also a good time to explore the "power slider" roast method that was recently enabled with the help of Tije de Jong who installed three SSR's inside the control space of the FZ94 roaster and Marko Luther who built this slider option into Artisan, creating the option to control the PID in such a way that the slider on the computer screen changes the intensity of the heat coming from the three heating elements below the rotating drum inside the FZ94 roaster.


I configured Artisan so that the full 0-99% range of the heating power slider actually covers the spread between 65% and 99% of maximum energy.
 |
| Slider range settings |
This handwritten table gives an impression of the spread and range of the sliders, with the power slider on the right:
 |
| Slider range: 50% of slider on screen corresponds to 82% of max power into the 3 heating elements. |
 |
| Warming up automatically to a set target of 215ºC BT
After a number of roasts, I noticed that a nice declining Rate of Rise was best accomplished when I would load the machine with more energy and a BT probe value 220ºC with a DT of 160ºC currently seems optimal to cruise along the pre-designed roast curve:

The first 1kg batch that I roasted of these beans had a lower pre-charge temperature of BT=202ºC with DT=150ºC and this resulted in a near linear Rate of Rise up to FC and a bean of the roast color Tonino #83 which is on the dark side for me. Two weeks after roast I found the espresso dark, spicy, earthy and round with a "dark" aftertaste. Not very complex.

You can see (red line in the above graph) how I slide back the power of the heating elements in small steps after the 8th minute, while increasing airflow after the 7th minute (light blue line).
On the "title" line above the profile you can read some relevant values of the process. In the above graph that is: FZ94-88 the 88th logged roast on this FZ94 roaster Mandheling indicating the beans / origin B01 Batch number 1 of this shipment / harvest 1kg charged 1kg of green beans St200 pre-heating until BT probe showed 200ºC 16.1% weight loss measured after roast (1000g in, 839g out in this case) T83 roast color measured with the Tonino device
Batch 5 shows more distinct moves on the slider, a higher charge temperature and this time the beans turned out on the light side with Tonino 100. Area Under Curve is 428C*min and I planned to go for a higher value of that on next batches:
 |

Next, I moved the machine to a place closer to my kitchen and I did not need the open window anymore so a more stable room temperature airflow was fed to the roaster. This also shortened the time needed for pre-heating.
This enabled me to develop a much more easily repeatable pattern and a roast that is consistently pleasing with a spicy, sweet taste and a rich aroma:

Same with the two next batches:


Variations in roast color of T89-T95 are minute and the overall consistency can be established by looking at the combination of profile, AUC value, weight loss, Tonino value, end temp and roast time.
It was already possible to use sliders for airflow and this allows a very effective way to build up more heat or quickly dissipate heat in case of an impending overshoot (which can be observed by looking at the way the Rate of Rise changes).
Additionally and decisively for me, the option to use sliders to finetune the power going into (and radiating out of) the three heating elements, instead of switching one or more elements completely OFF or ON, is an extremely helpful way to precisely slide along the intended roast curve for the desired production result in the espresso cup.
Greetings from Poland, where the Mandheling beans taste great!

PS Marc Assink, a fellow roaster in The Netherlands, purchased from the same Mandheling stock and he roasted 800g on his 1kg Toper Cafemino roaster. This machine is unable to regulate the heat input and there is limited control of airflow so the options to modulate the profile are also limited:

A picture of the resulting beans:

He described the taste as "spicy -- good for cappuccino, nice, not spectacular" so it probably was a dark-ish roast. Like another friend who roasted these same beans, he remarked that FC is hard to distinguish. SC is at times more audible and I decided to just automatically mark the onset of FC at the temperature level where one can mostly observe the BT suddenly rising, a sign of the exothermal reaction typical for FC.
Marc has since purchased a 2.4kg HAS Garanti roaster so he will be back, in time, with a more detailed and better configurable approach.


Reacties
Thanks for writing! Have you checked my more recent profiles?
like https://kostverlorenvaart.blogspot.com/2021/12/roasting-png-with-eye-on-energy-use.html
I have the BT probe in another location than the factory default, which gives a higher BT reading.
Have you published details of your Fuji PID mod somewhere? I would love to see it and compare.
You could aso send me the text & photos and then I would post it here.
Best regards,
Frans
I haven’t read your more recents posts. I’ve read only those about adding FUJI to FZ94. But will definetly check those ;-)
I have a 3mm duplex probe in the trier and I’m getting a bit higher BT reading. FC starts at about 200c. That is about 16c plus compared to the original BT probe. But even with this I can’t get higher than 190 - 195c for the charge temp. I’m on 20% airflow at that time. Will give you more info after I do some changes based on reading your posts. You are still using the PXG or PXF? Thanks and have a great day!
My FC is also at a point where the probe measures 190-195ºC which is fine by me.No probe measures 'real' bean temp and the measurement is there to ensure consistency, not to confirm a theoreticeal temperature of a bean ;-)
I hope I can get power slider to work. I don’t really understand where is the problem now. The setting is overwriten by the SV everytime I do a change.
Would you actually be willing to share your Artisan setting? I understand PXF can have a bit different settings but the core should be the same. Thanks so much ;-)