Most La Pavoni home levers have the pressure relief valve but no anti-vac so at startup you need to release some steam to get up to the correct temperature and after turning it off the lever is sometimes "sucked" upwards by the under-pressure in the boiler.
La Pavoni puts more modern valves on their new models. These have two-in-one: it's a pressure relief valve that opens when a maximum pressure is reached, to avoid breakage, it releases some steam during warm up and it allows air to get sucked back into the boiler when cooling down.
A fine reason to go visit Peter van der Weerd in his www.kafko.nl workshop, and enjoy his company, chatting about things related to coffee machinery, life, family, pleasure... and coffee.
Peter van der Weerd upgraded my old La Pavoni Pro with this new valve and in the process he did a check up of the machine, replacing a rubber seal in the boiler cap and also replacing the heating element which had suffered some overheating in the past and turned out to have less than "infinite" electric resistance which might cause a shock someday.
Taking off the old pressure relief valve
Steam wand & old pressure relief valve off
Taking a look at the bolt inside the boiler
Taking off the pressure gauge
Preparing to take off the heating element
Looking from the open bottom up to the bolt of the oldvalve
Taking off the old valve
getting the new valve ready
Inside of the new valve, check the anti-vac
close up of anti vac
Holding the bolt to fasten the new valve
Sliding on the new valve combination
Fastening
New element in, connecting the copper tube to the OPV
Roasting coffee beans, you want to be as consistent as you can, replicating a successful roast while collecting enough data (besides what you see, feel, smell and taste from the coffee) to get an idea what you may be doing wrong if the results are not so good all of a sudden. The Artisan software for coffee roasters has a feature to help you keep track of volume and density of your beans. Density is a word for the weight of a certain volume of beans and it can be measured in grams per liter. Your green beans are obviously more dense than the roasted beans: roasted beans have grown a lot in size and they have lost weight (moisture) in the process. In his new book “ The Coffee Roaster’s Companion ”, the famous Scott Rao explains these things: “Ideally, water should account for 10.5%-11.5% of green-coffee weight.” (p.3) “Coffee loses 12-24% of its weight during roasting, depending on initial moisture content, roast degree and inner-bean development during roasting. T...
(also see Daily Coffee News feature ) Tije designed and made the following structure for a tiny and cheap fluid bed roaster, to which Jan van der Weel added the Arduino parts, electronics and programming: Sketch by Tije de Jong Jan sourced a very cheap blower (€ 11) to start with, Tije developed and constructed the mechanics, Jan built together and programmed the TC4 / SSR electronics. On his blog, Jan will specify exactly how the TC4 part is combined and programmed and I will copy these details into this blog entry, just as Jan will use this video in his blog. We did a few test roasts to make sure it works at all and it does. Towards the end, the first roast tended to get a flat BT line and airflow was slightly decreased. 200g seems max load of green beans. Second roast a little more power was given to the heater. Next we will try the Background Roast driven by the PID software of Artisan. A week later, with updated software that works better to change the...
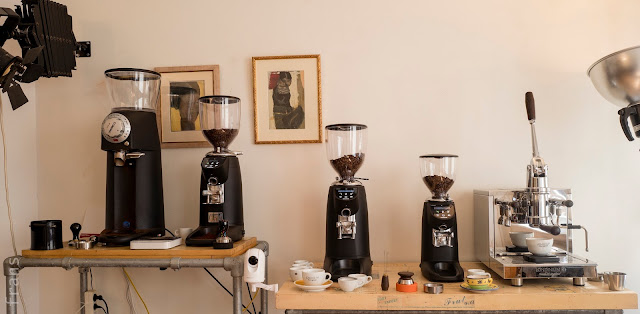
COMPAK models R120, E8, E6 and E5 lined up next to LONDINIUM L-R First impression, notes after a visit from Roemer Overdiep: Roemer came over to taste espressos from all 4 grinders. We made sure to every time have 18g in the 18g VST basket, using the distribution tool, getting about 30g of espresso in about 30s. R120 was best, E8 ‘redspeed’ almost as good, the E6 and E5 were somewhat similar in that the espresso was excellent but in comparison with E8 / R120 it has more ‘sharpness’ — the R120/E8 were softer, more subtle. If someone has excellent beans, an excellent espresso can be prepared with the E5 and only if one also has the bigger E8 nearby would one notice there might be something extra in buying the bigger grinder. Difference between E5 and E6 seems minimal. These tests were done with a first roast of Kenya beans. We poured the beans from the hopper of one grinder to the other while testing and gradually the hippers got emptier. Data about these 4 different sizes gri...


Reacties