Tije used his lathe to carve a ripple in the bottom of the tamper that he made for his La Pavoni and for him, this solved the issue of grinds climbing up against the basket wall during his "nutating' and tamping.
Below is a little video, also showcasing the new ROK grinder that he uses and some modifications. He added a little collar to the bottom of the grinder to help prevent grinds flying around with static electricity. This addition may help a little but a droplet of water appears more effective. He also made a seat for the La Pavoni naked portafilter with a magnet in the bottom which then auto-centers to rest exactly below the axis of the burrs.
Since I got the latest LONDINIUM button tamper which has a tapered form, I rarely use the original straight sided button tamper so I asked Tije to carve ripples in that bottom as well. On my system this does not seem to make a big difference but I do like the feel of it and also the looks of the puck.
Original tamper, now rippled on the left, the new tapered LONDINIUM tamper on the right
Tamping
Rippled puck
After extraction: impression of the shower screen and faint traces of the 'ripples'
Roasting coffee beans, you want to be as consistent as you can, replicating a successful roast while collecting enough data (besides what you see, feel, smell and taste from the coffee) to get an idea what you may be doing wrong if the results are not so good all of a sudden. The Artisan software for coffee roasters has a feature to help you keep track of volume and density of your beans. Density is a word for the weight of a certain volume of beans and it can be measured in grams per liter. Your green beans are obviously more dense than the roasted beans: roasted beans have grown a lot in size and they have lost weight (moisture) in the process. In his new book “ The Coffee Roaster’s Companion ”, the famous Scott Rao explains these things: “Ideally, water should account for 10.5%-11.5% of green-coffee weight.” (p.3) “Coffee loses 12-24% of its weight during roasting, depending on initial moisture content, roast degree and inner-bean development during roasting. T...
(also see Daily Coffee News feature ) Tije designed and made the following structure for a tiny and cheap fluid bed roaster, to which Jan van der Weel added the Arduino parts, electronics and programming: Sketch by Tije de Jong Jan sourced a very cheap blower (€ 11) to start with, Tije developed and constructed the mechanics, Jan built together and programmed the TC4 / SSR electronics. On his blog, Jan will specify exactly how the TC4 part is combined and programmed and I will copy these details into this blog entry, just as Jan will use this video in his blog. We did a few test roasts to make sure it works at all and it does. Towards the end, the first roast tended to get a flat BT line and airflow was slightly decreased. 200g seems max load of green beans. Second roast a little more power was given to the heater. Next we will try the Background Roast driven by the PID software of Artisan. A week later, with updated software that works better to change the...
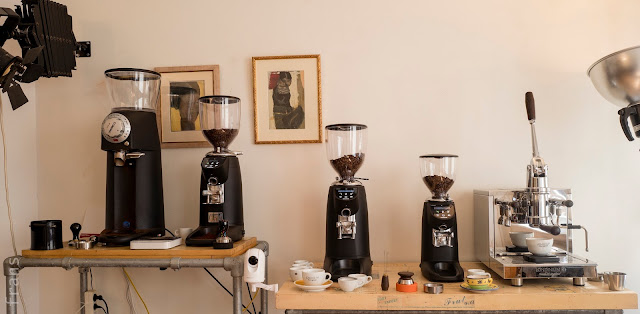
COMPAK models R120, E8, E6 and E5 lined up next to LONDINIUM L-R First impression, notes after a visit from Roemer Overdiep: Roemer came over to taste espressos from all 4 grinders. We made sure to every time have 18g in the 18g VST basket, using the distribution tool, getting about 30g of espresso in about 30s. R120 was best, E8 ‘redspeed’ almost as good, the E6 and E5 were somewhat similar in that the espresso was excellent but in comparison with E8 / R120 it has more ‘sharpness’ — the R120/E8 were softer, more subtle. If someone has excellent beans, an excellent espresso can be prepared with the E5 and only if one also has the bigger E8 nearby would one notice there might be something extra in buying the bigger grinder. Difference between E5 and E6 seems minimal. These tests were done with a first roast of Kenya beans. We poured the beans from the hopper of one grinder to the other while testing and gradually the hippers got emptier. Data about these 4 different sizes gri...


Reacties