Curve Controlled Coffee Roasting
With the newest (soon to be published) version of the free Artisan coffee roast software it is possible to have Artisan do much more than just send a "Ramp Soak" wish list for a profile and then log the roast.
Curve and formula
It is now possible to give Artisan full control of the roaster and to let the roast curve of your own design dictate the way the roast should go. And even, if you want to go super-nerdy, roast by formula. The Artisan math module can come up with a formula that yields your preferred profile and then you can send this formula to a fellow roaster or you can save it to re-create that profile elswehere on the fly later on. This can then in turn be used to navigate precisely along that roast curve, on auto pilot.
It enables you to ensure consistency in your roasts and it frees up time during the roast so you can focus on any tiny detail and modify at will.
Rate of Rise
I tried it for the first time late last night and again this morning. It works very well with only about 1ºc in variance from the design. A special advantage for me is that at the onset of First Crack, I see no serious drop in Bean Temperature and without Rate of Rise touching zero. So with no "flatline" the temperature in the bean is always rising and over the full profile of the roast the Rate of Rise is continuously and gradually declining, as one would wish.
Design
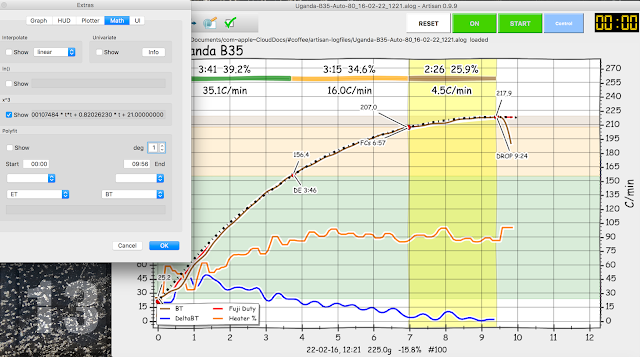
First, open the Artisan module that allows you to design your roast profile, moving the three main points over the time-and temperature axis. The brown curve is the Bean Temperature, the blue line is the Rate of Rise which we want to see gradually decline. Here I aim for 165ºC at 4 minutes into the roast, FC starting at 207ºC at 7 minutes and the roast ending at 9:25 minutes at 218ºC. For my current beans from Uganda, this works very well.

Checking the RoR, time and temp, then saving the designed profile to later load in the background:

Loading this new profile in the background. Note how the current (moment zero) target temp of 22ºC is already noted. The program is ready to go and instruct the Fuji PID what to do with the roaster once it's on.

Previously
Before, I would have first translated the BT points for every full minute until FC and the desired end temp at DROP, and written these down to enter into the PID using Artisan:

Here you see a typical Ramp Soak sequence which I would have entered from the Set RS menu:

Note that in this case with the latest software version, I have already clicked "Follow Background" at the bottom, and set a "Lookahead" of 4 seconds. This means that instead of using the RS list, the PID will listen to realtime commands from Artisan, and Artisan will continuously tell the PID where to aim for in the coming seconds.
Below, I have cleared the old RS lost of control points to zero, so I will be sure that there will be no interfering plans.


Next, testing if a target value written to SV1 is immediately displayed on the PID led screen and indeed, the 2ºC target appears promptly. This is the "language" used by Artisan to keep sending commands to the PID steering it along the roast curve, so that's good.

Beans loaded, Fracino Roastilino roaster started, pressed CHARGE on Artisan and YES, the software steers the PID along the background line, the Fuji PXG4 PID uses the throttle on the heater to keep the roaster steady on the target and the RoR is following the declining trend.


Now, on to an even more ambitious level. Extracting a math formula to define our profile:
Next, entering this formula in a new screen, which gives us a super clean curve again:
Saving this result as a background, and loading it for a roast that will copy the original it was extracted from:

Repeatable
From here, it's simple to repeat the roast process displayed above.
So fellow roasters with compatible devices can send one another a roast plan, but they can also just send a formula like this:
PS
Theoretically one could even shoot a fellow roaster the QR code for the above roast formula. Roemer Overdiep converted this one:

(Note: make sure to check out the donations page if you want to tell Marko how happy you are with the software he provides and supports with his voluntary work!)
Curve and formula
It is now possible to give Artisan full control of the roaster and to let the roast curve of your own design dictate the way the roast should go. And even, if you want to go super-nerdy, roast by formula. The Artisan math module can come up with a formula that yields your preferred profile and then you can send this formula to a fellow roaster or you can save it to re-create that profile elswehere on the fly later on. This can then in turn be used to navigate precisely along that roast curve, on auto pilot.
It enables you to ensure consistency in your roasts and it frees up time during the roast so you can focus on any tiny detail and modify at will.
Rate of Rise
I tried it for the first time late last night and again this morning. It works very well with only about 1ºc in variance from the design. A special advantage for me is that at the onset of First Crack, I see no serious drop in Bean Temperature and without Rate of Rise touching zero. So with no "flatline" the temperature in the bean is always rising and over the full profile of the roast the Rate of Rise is continuously and gradually declining, as one would wish.
Now on to the step by step illustrations!
Design
First, open the Artisan module that allows you to design your roast profile, moving the three main points over the time-and temperature axis. The brown curve is the Bean Temperature, the blue line is the Rate of Rise which we want to see gradually decline. Here I aim for 165ºC at 4 minutes into the roast, FC starting at 207ºC at 7 minutes and the roast ending at 9:25 minutes at 218ºC. For my current beans from Uganda, this works very well.

Checking the RoR, time and temp, then saving the designed profile to later load in the background:

Loading this new profile in the background. Note how the current (moment zero) target temp of 22ºC is already noted. The program is ready to go and instruct the Fuji PID what to do with the roaster once it's on.

Previously
Before, I would have first translated the BT points for every full minute until FC and the desired end temp at DROP, and written these down to enter into the PID using Artisan:

Here you see a typical Ramp Soak sequence which I would have entered from the Set RS menu:

Below, I have cleared the old RS lost of control points to zero, so I will be sure that there will be no interfering plans.

Double checking the RS list: all zero.

Next, testing if a target value written to SV1 is immediately displayed on the PID led screen and indeed, the 2ºC target appears promptly. This is the "language" used by Artisan to keep sending commands to the PID steering it along the roast curve, so that's good.

Beans loaded, Fracino Roastilino roaster started, pressed CHARGE on Artisan and YES, the software steers the PID along the background line, the Fuji PXG4 PID uses the throttle on the heater to keep the roaster steady on the target and the RoR is following the declining trend.

One finished roast:

Another. 225g beans loaded, 13.3% weight loss, roast color spot on with Tonino #101:

Now, on to an even more ambitious level. Extracting a math formula to define our profile:

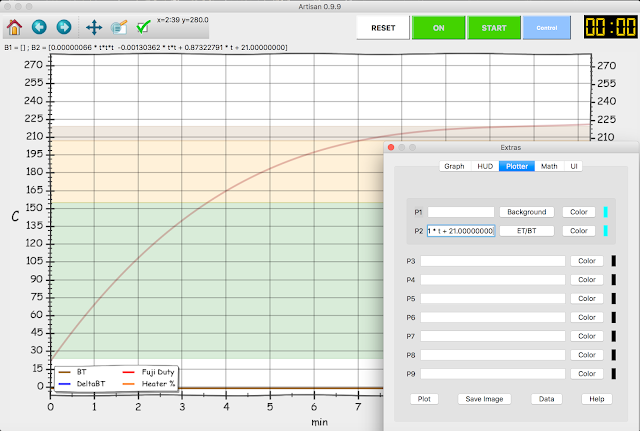
Next, entering this formula in a new screen, which gives us a super clean curve again:
0.00000042 * t*t*t -0.00107484 * t*t + 0.82026230 * t + 21.00000000

Saving this result as a background, and loading it for a roast that will copy the original it was extracted from:

Repeatable
From here, it's simple to repeat the roast process displayed above.
So fellow roasters with compatible devices can send one another a roast plan, but they can also just send a formula like this:
0.00000042 * t*t*t -0.00107484 * t*t + 0.82026230 * t + 21.00000000
For the other to load in the background and off they go.
Thanks:
I'm VERY grateful to Marko Luther for his continuous support and intense development of this excellent piece of FREE software that does much more than any commercial product in the same industry.
And to Jan van der Weel for his ideas about this approach!
Also, I am still very thankful to Wayel Al-Wohaibi from Ryadh in Saudi Arabia for originally telling me how to build, connect and configure the Fuji PXG4 PID control box.
And if Adrian Maxwell and his staff of the Fracino factory in Birmingham had not built their beautiful little versatile Fracino Roastilino in such an open and still very safe way, I would not have this easy access to a roaster that works well in the home, by a wide open window.
Anyone can use this machine, these ideas, this software. Feel free!
Thanks!!
PS
Theoretically one could even shoot a fellow roaster the QR code for the above roast formula. Roemer Overdiep converted this one:
 |
| A practically perfect curve. The "lookahead" was set at 10s here |
 |
| "Lookahead" at 11s, better RoR scale (more visible) |
 |
| Different bean and quantity, Costa Rica |
 |
| Getting better at hand regulating the airflow to improve the smoothness of the profile |


Reacties
Great blog post!
How do these auto roasts taste compared to your manual roasts?