Motorizing HG One: finished
(This is the final part of a short series of blogs. See also Part 1, Part 2 and Part 3)
Today I took the new DC power supply to Tije's workshop, where he connected the power cable to the old FIAT 132 windshield wiper motor.
Here's a picture of a Fiat 132:

We decided to keep the old wires in place and in sight, saving the vintage quality and looks even though just two wires are used: that black connects to the mass and the red connected to the power end of the motor. The other wires were for different speeds and for ensuring that the windshield wipers would stop in the 'neutral' position (lying down).
First we used two multimeters to monitor the Voltage and current during workshop test runs of the motorized grinder.
Before doing this, we checked how the internal fuse of the DC power supply handles the considerable startup load of the heavy transformer. The fuse does not exactly blow now but it does light up for a flash and I will get a "slow" type of 1.5A fuse to replace it. For now we have a 2A fuse in there.
Then there was also some concern about the torque of the motor. What would it do on a 'cold start' with a handful of beans sitting between the burrs? If the motor is unable to initiate the grinding, it halts and either the fuse could be blown or the axis / coupler could give, causing the transmission to break and slip. If necessary we could decide the grinder needs to be started with on load and the beans always chucked in on turning burrs.
Luckily, the combination works very well as it is.
Turning with hardly any load, the DC power is a steady 23 V at just 2.7 A.
Pouring a handful beans on turning burrs, the power falls to 18.6 V at a soaring current of 6.42 A:

On a cold start with a handful of beans on the burrs, the combination starts up fine and draws momentarily 6.57 A at 19.27 V.
Next we closed the lid on the DC power supply and packed everything up to install the combination in my home lab for the final "proof of the pudding":
I want to thank Tije for all his excellent work and inventiveness. He makes these things look almost easy as he is both quick and careful with all details, creating a combination that to me looks very simple and elegant, low-budget and classy.
And the HG One grinds steady as ever! Maybe even more steady than before, because hand grinding on the flywheel involves varying muscle power, varying speeds and sometimes a short halt to re-start when a particularly hard bean type is being ground.
When I timed the grinding speed, 20g Panama Geisha (from Graciano Cruz) ground in 35 seconds.
Without load, the motor axis turns 80 rpm, with beans on the burrs it's more like 60 rpm.
The vortex in the top middle of the picture is just there for geeky distraction. To the left are two of my La Pavonis. Both have the Tije cooling ring to prevent overheating of the brew group when the machine is on for a long time and both have a NAKED portafilter by Kavékálmár. To the right is the Tonino roast color analyzer. And on the left front, the excellent Acaia scale.
---
PS about the measured voltage:
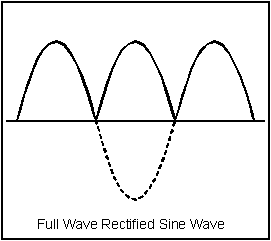
The one in the video above is measuring & displaying Volts DC, even though the wave coming out of the rectifier is of course not one flat line of Voltage but rather a series of humps, the low swings of the AC sine wave mirrored upwards.
So on a scope we could see what the value is that we really get, and an average could be calculated probably.
Or if I was really smart I'd use this calculator:
http://www.daycounter.com/Calculators/RMS-Calculator.phtml
Referring to http://www.ncatt.org/_documents/AET_9_Rectifiers.pdf
I could multiply 23.5 V with .636 and get 14.9 V as Average Output Voltage.
An electronics engineer could comment if I'm right here.
Today I took the new DC power supply to Tije's workshop, where he connected the power cable to the old FIAT 132 windshield wiper motor.
Here's a picture of a Fiat 132:
We decided to keep the old wires in place and in sight, saving the vintage quality and looks even though just two wires are used: that black connects to the mass and the red connected to the power end of the motor. The other wires were for different speeds and for ensuring that the windshield wipers would stop in the 'neutral' position (lying down).
First we used two multimeters to monitor the Voltage and current during workshop test runs of the motorized grinder.
Before doing this, we checked how the internal fuse of the DC power supply handles the considerable startup load of the heavy transformer. The fuse does not exactly blow now but it does light up for a flash and I will get a "slow" type of 1.5A fuse to replace it. For now we have a 2A fuse in there.
Then there was also some concern about the torque of the motor. What would it do on a 'cold start' with a handful of beans sitting between the burrs? If the motor is unable to initiate the grinding, it halts and either the fuse could be blown or the axis / coupler could give, causing the transmission to break and slip. If necessary we could decide the grinder needs to be started with on load and the beans always chucked in on turning burrs.
Luckily, the combination works very well as it is.
Turning with hardly any load, the DC power is a steady 23 V at just 2.7 A.
On a cold start with a handful of beans on the burrs, the combination starts up fine and draws momentarily 6.57 A at 19.27 V.
Next we closed the lid on the DC power supply and packed everything up to install the combination in my home lab for the final "proof of the pudding":
I want to thank Tije for all his excellent work and inventiveness. He makes these things look almost easy as he is both quick and careful with all details, creating a combination that to me looks very simple and elegant, low-budget and classy.
And the HG One grinds steady as ever! Maybe even more steady than before, because hand grinding on the flywheel involves varying muscle power, varying speeds and sometimes a short halt to re-start when a particularly hard bean type is being ground.
When I timed the grinding speed, 20g Panama Geisha (from Graciano Cruz) ground in 35 seconds.
Without load, the motor axis turns 80 rpm, with beans on the burrs it's more like 60 rpm.
The vortex in the top middle of the picture is just there for geeky distraction. To the left are two of my La Pavonis. Both have the Tije cooling ring to prevent overheating of the brew group when the machine is on for a long time and both have a NAKED portafilter by Kavékálmár. To the right is the Tonino roast color analyzer. And on the left front, the excellent Acaia scale.
---
PS about the measured voltage:
The one in the video above is measuring & displaying Volts DC, even though the wave coming out of the rectifier is of course not one flat line of Voltage but rather a series of humps, the low swings of the AC sine wave mirrored upwards.
So on a scope we could see what the value is that we really get, and an average could be calculated probably.
Or if I was really smart I'd use this calculator:
http://www.daycounter.com/Calculators/RMS-Calculator.phtml
Referring to http://www.ncatt.org/_documents/AET_9_Rectifiers.pdf
I could multiply 23.5 V with .636 and get 14.9 V as Average Output Voltage.
An electronics engineer could comment if I'm right here.


Reacties